

Super resolution microscopy
New techniques use a variety of methods to break the diffraction limit of light
The human eye can see an object as small as a single human hair, which measures only 0.05 mm (or 50 µm) in width on average. However, if we need to see anything smaller, we turn to microscopes.
Everything we see is thanks to light, which passes from objects into our eyes. By using a lens (such as a magnifying glass) we can bend and focus that light, which lets us see smaller objects. Conventional light microscopes are essentially a series of lenses that bend light from a light source, through a sample and into your eyes, or into a camera. This allows us to see ever‑smaller objects such as cells and bacteria, which is hugely important for biological study. These studies can reveal important information and inform scientific and medical discoveries, enabling better understanding of disease and helping to improve overall quality of life.
However, cells and bacteria (and the smaller structures inside them) are mostly water and are therefore transparent. Imaging tiny see-through bags of water results in images that don’t contain a lot of information, and in microscopy it is usually vital to have some sort of contrast or dye/stain that will give areas of the sample a color and make them far easier to see (although there are some techniques that bypass this need). In addition, what if you only want to image some of the smaller structures inside a cell, like the nucleus or the cell membrane? Coloring the entire cell would make it impossible to localize the areas you are interested in.
Fluorescence microscopy solves both these issues of contrast and localization. Fluorescence is where an object will emit light after absorbing light. Many different objects exhibit fluorescence, such as minerals (the word fluorescence coming from the mineral fluorite), deep‑sea fish (most famously the jellyfish Aequorea victoria, from which green fluorescent protein (GFP) was discovered), plants, chemicals and many more.
Fluorescent chemicals (known as fluorophores) are used to label samples, and fluorophores are available that emit light in virtually any color. In a fluorescent microscope a sample is labelled with a fluorophore, and then a bright light (excitation light) is used to illuminate the sample, which gives off fluorescence (emission light). In this manner, samples are highly contrasted to the black background as the fluorophore emits a bright colored light. By localizing these fluorophores to the area of interest a clear image of any part of a cell can be taken, making fluorescence microscopy a powerful tool for life sciences.
What is super resolution microscopy?
Fluorescence microscopy is used to observe and image objects that are too small for the human eye to see properly. However, there is also a limit to what these microscopes can see, as they are limited by the diffraction limit of light and can only observe/image samples that are larger than approximately 200 nm in size. Human cells are typically 10 µm in diameter, meaning that microscopes can easily observe them but smaller components inside the cell (mitochondria, nucleus etc.) and other organisms like bacteria and viruses can be over 100x smaller, and other samples like DNA and proteins can be smaller still. If researchers want to observe these small samples they can’t do it with normal ‘diffraction-limited’ microscope techniques, and need techniques that can break through this diffraction limit: ‘super resolution’ techniques.
Diffraction limit of light
The smallest point that can be seen with a diffraction-limited system is called an Airy disk, named after the mathematician George Biddell Airy. Because light travels as a wave, when it passes through the small microscope aperture the light spreads out into a diffraction pattern, spreading the light out over a wide area, as seen in Fig.1.
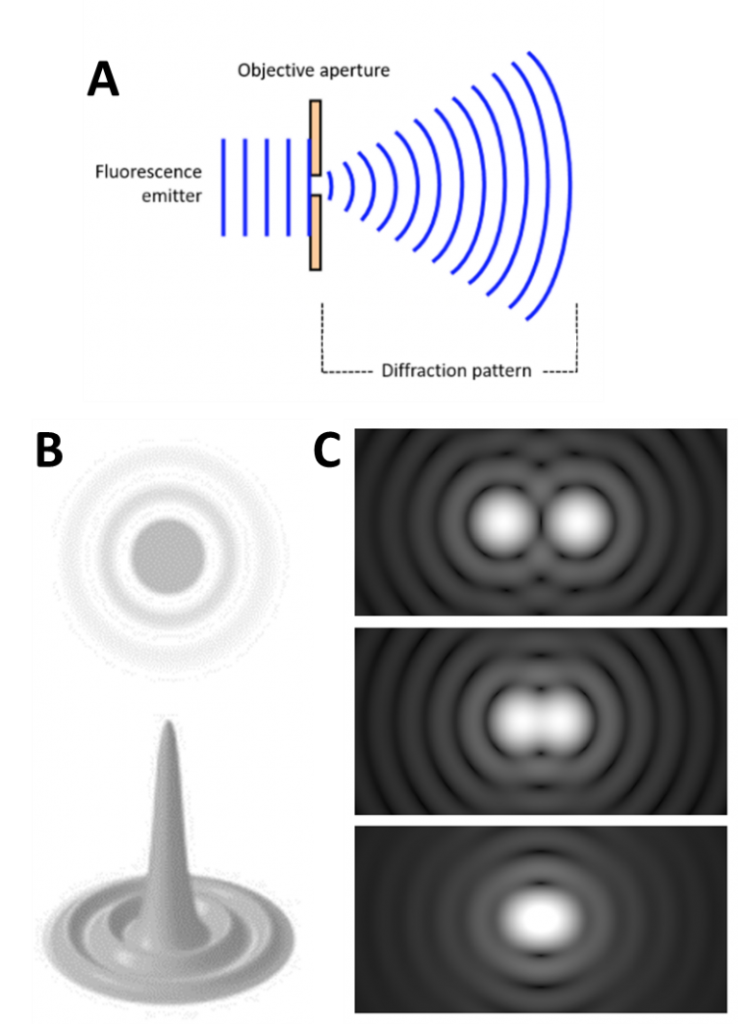
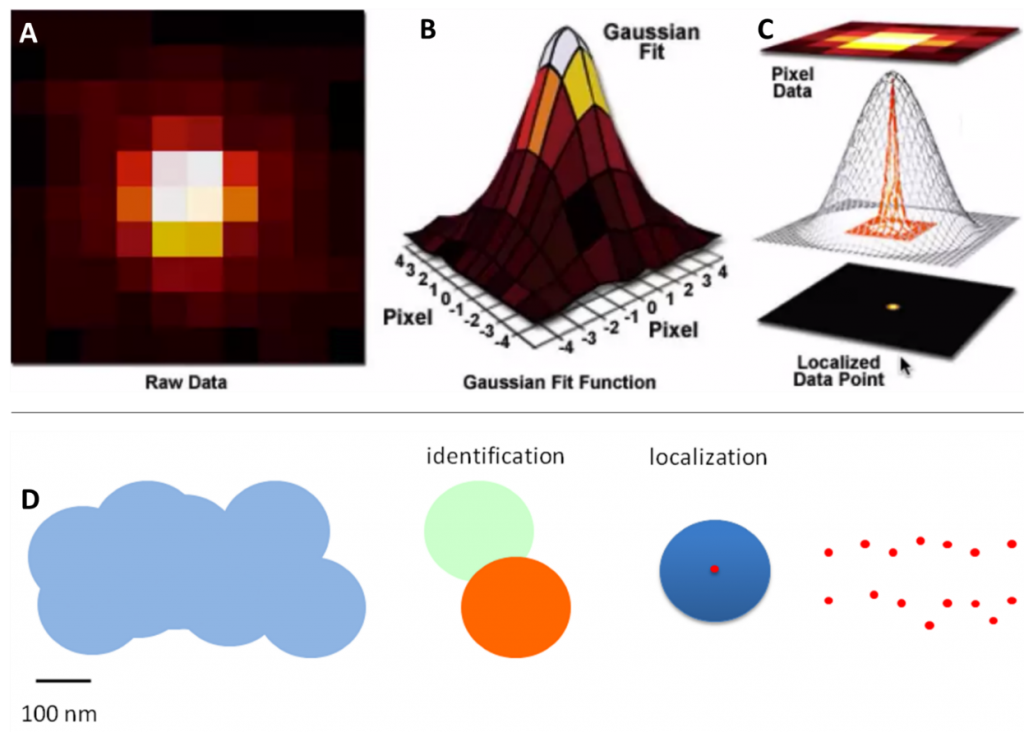
The spreading light forms an Airy disk (Fig.1B) and illuminates everything across a large area, making it impossible to pick out smaller sub-200 nm sized structures. Statistics can be used to convert the Airy disks into smaller points: because an Airy disk is brighter at the center, a point is fitted to the brightest spot. This point is accurate up to 1 nm and can improve image quality (Fig.2).
However, the main issue is highlighted in Fig.1C: if two Airy disks get too close together they can merge into one, making it impossible to tell close objects apart. These merged disks are counted as one data point and information is lost, even with the statistical fitting. Microscope samples contain millions of molecules that can be various distances apart, if they are too close they will be observed as a single point instead of multiple points. Only with super resolution techniques can these samples be properly imaged.
Super resolution techniques
Super resolution techniques use a variety of methods to break the diffraction limit of light, and can be broken down into a few main categories.
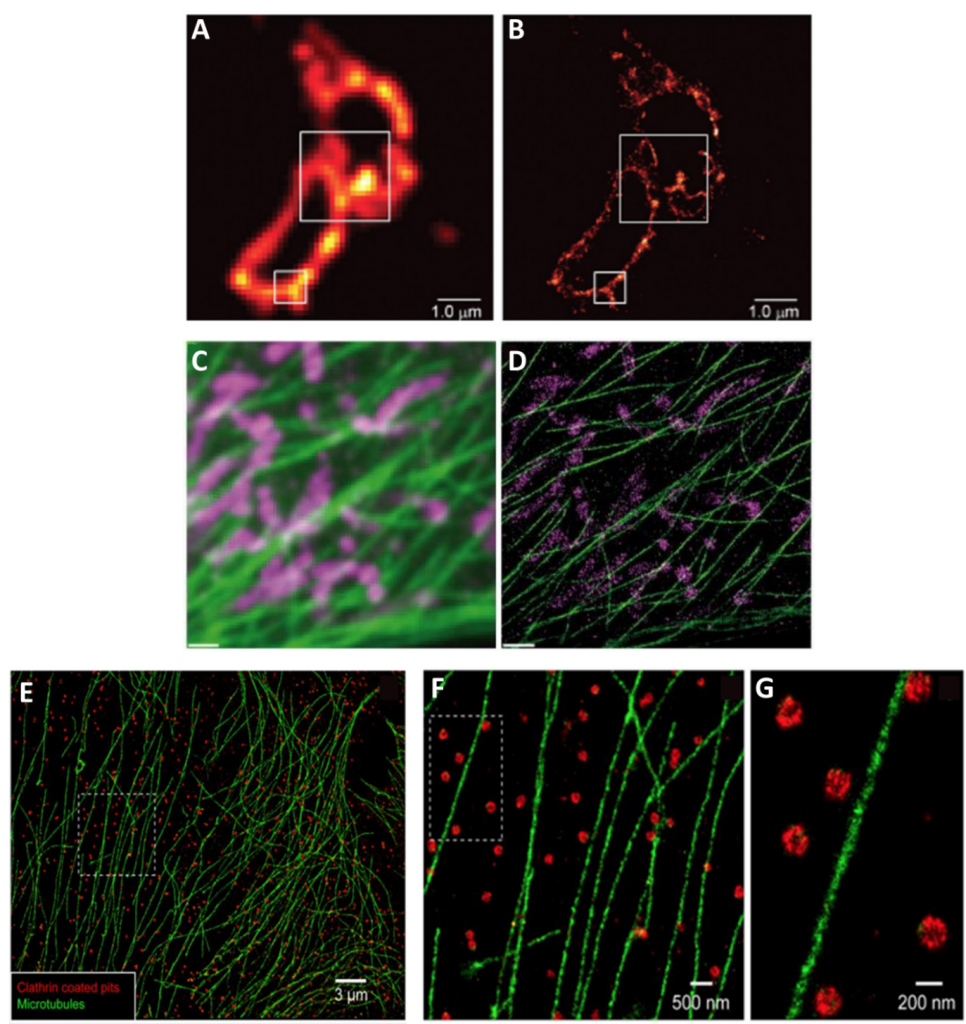
Localization techniques overcome the problem of overlapping fluorophores by using fluorescent molecules that switch on and off at random. By taking thousands of images enough data is captured where all the molecules would have been “on” at least once. Molecules close together in space, are unlikely to both be “on” at the same time in the same image frame and can therefore be separated by time. Techniques in this category include: photoactivated localization microscopy (PALM) (seen in Fig.3A-B), stochastic optical resolution microscopy (STORM) (seen in Fig.3E-G), and DNA-based point accumulation for images in nanoscale topography (DNA-PAINT) (seen in Fig.3C-D).
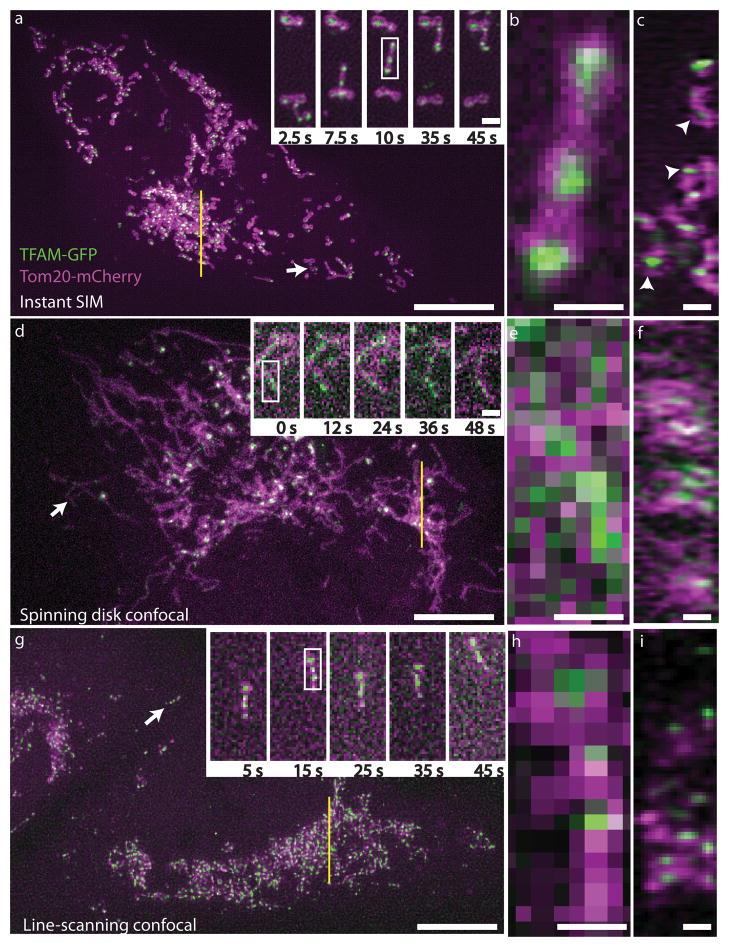
Structured light techniques use patterns of light instead of normal illumination. The basic technique in this category is structured illumination microscopy (SIM). When two patterns are overlaid it creates an interference pattern called a Moiré pattern, by imaging through these Moiré patterns super resolution images can be achieved. A useful variation of SIM is instant SIM (iSIM) which is up to 10,000x faster than PALM/STORM, and uses patterns of light that are scanned across the sample. Examples of iSIM images are shown in Fig.4. This technique is similar to spinning disk confocal microscopy, which can also achieve super resolution imaging.
By breaking through the diffraction limit of light, super resolution microscopy can image small samples with high resolution, pushing the boundaries of scientific research.
 Spinning Disk Confocal Microscopy
  A Hyperspectral Sight on the Stain